> ## Documentation Index
> Fetch the complete documentation index at: https://support.bolt.new/llms.txt
> Use this file to discover all available pages before exploring further.
# Use skills to apply reusable instructions
> Learn how to add rules and workflows Bolt can apply while planning or building.
Skills are reusable instructions that teach Bolt how to handle specific scenarios. Each skill has a name, a description that tells Bolt when to apply it, and the instructions themselves. Skills are available on all plans.
Use a skill for rules or workflows you need often, like UI copy guidelines or a launch checklist. Add your instructions and Bolt follows them automatically when [planning](/best-practices/plan-mode) and building, so you don't have to explain them every time.
Get started by [writing a skill](#write-instructions-manually), [asking Bolt to write one for you](#create-a-skill-from-chat), or [importing a skill](#add-a-skill) from a source you trust.
After a skill is in your workspace, you can turn it on in any project. Then, Bolt applies it whenever your prompt matches the skill's description, or you can apply it manually by typing `/$skill-name` in the chat.
## What's the difference between skills and knowledge?
Skills only apply in certain situations (defined in the skill description), while knowledge applies to every prompt.
| | When to use it | Example |
| ------------- | ----------------------------------------------------------- | --------------------------------------------------------------------------------- |
| **Skills** | Use for repeatable workflows and instructions. | "Use this checklist to test pages in the app against my accessibility guidelines" |
| **Knowledge** | Gives Bolt persistent context that applies to every prompt. | "This project is a mobile app built on React.js" |
If you want Bolt to interact with an external tool (like getting information from Linear), you need a connector instead of a skill. Connectors give Bolt access to external tools and live data. To learn more, see [Connect an MCP server](/building/using-bolt/connect-mcp).
## Workspace, project, and Bolt-curated skills
Skills are available at the workspace level and the project level. You can add skills yourself or use built-in skills that Bolt manages for you.
### Workspace skills
Skills you add in **Workspace** > **[Skills library](#skills-library-workspace)** are available to [turn on or off](#turn-skills-on-or-off-in-a-project) in individual projects.
In a team workspace, this appears under your team's name instead of the label **Workspace**.
### Project skills
Skills you add in **Project settings** > **[Skills](#skills-project)** are stored in your project's code. They're always turned on.
Skills available in your workspace can be on or off by default for each project, depending on the workspace type:
* **Personal workspaces**: Skills are turned on by default in each project.
* **Team workspaces**: Admins add skills, and they're turned off by default. Team members [turn them on](#turn-skills-on-or-off-in-a-project).
### Bolt-curated skills
Bolt maintains a built-in set of skills you can turn on in your projects. Unlike skills you add, you can't edit or remove Bolt-curated skills.
Bolt-curated skills include:
* SEO/GEO
* Skill Creator
* Web Design Guidelines
* Writing Guidelines
Skill Creator lets Bolt create skills for you in the chat. It's always turned on.
Other Bolt-curated skills are turned off by default. To use them, [turn them on in your project](#turn-skills-on-or-off-in-a-project).
If you have your own skill covering the same topic as a Bolt-curated skill, leave the Bolt-curated skill turned off.
## Go to your Skills settings
Workspace and project skills have their own settings where you add or manage available skills.
### Skills library (workspace)
You can open the Skills library from the Bolt homepage or from inside a project.
To open the Skills library for your workspace:
1. In the top-left corner of the screen, click the account dropdown, then click **Settings**.
2. In the left navigation, click **Skills library**.
### Skills (project)
To open the Skills page for your project:
1. Open your Bolt project.
2. In the top menu, click the **gear icon**, then click **Skills**.
## Use skills safely
Before importing a skill, read the SKILL.md file completely so you know what instructions you're giving Bolt. Only use skills from developers or organizations you know and trust, or that you've read through yourself and fully understand. If a skill contains URLs you don't recognize, requests for sensitive information (like credentials or API keys), or instructions that change Bolt's behavior outside the scope of the task, it might be unsafe. If anything looks off, don't import the skill. Find another skill on the same topic, or write one yourself.
## Add a skill
Before you add a skill, decide where it should live. If you want it available for every project, add it to your workspace. If you only need it in one project, add it directly to that project.
If a project skill and a workspace skill have the same name, Bolt uses the project skill.
There are a few different ways to add skills. The following table shows where each method is available.
| Method | Workspace | Project |
| ------------------ | --------- | ------- |
| Import from GitHub | ✓ | ✓ |
| Import from a file | ✓ | ✓ |
| Write manually | ✓ | ✓ |
| Create from chat | | ✓ |
* To add a workspace skill, open the [Skills library](#skills-library-workspace).
* To add a project skill, open your project's [Skills page](#skills-project) or start chatting with Bolt.
### Import skills from GitHub
You can import skills from GitHub into a workspace or project.
To import a skill from GitHub:
1. Open the [Skills library](#skills-library-workspace) or your project's [Skills](#skills-project) page.
2. Click **Add skill**, then click **From GitHub**.
3. For each skill you want to import:
1. In **Repository URL**, enter a public GitHub repository.
Bolt automatically finds skills in the repo.
2. In the **Skill folder name** field, select the skill you want to import. If the repo contains a large number of skills, Bolt shows the first 100.
To see the skill's description before importing it, point to the **question mark icon**.
3. Click **Create**.
When Bolt finishes importing a skill, you'll see it listed among your available skills. If you added it from the Skills library, it shows under **In your workspace**. If you added it from your project's Skills page, it shows under **In this project**.
After you import a skill from GitHub, it's no longer linked to the source repository. To bring in later updates from GitHub, re-import the skill, then remove the outdated version.
Imported GitHub skills can be up to 2 MB in size.
### Import from a file
You can import skills from a file into a workspace or project. Skills files must use a `.md` or `.mdx` file extension, or a `.zip` file containing `.md` or `.mdx` files.
A `.zip` file can only contain one skill file, but you can include other Markdown files with examples for Bolt to reference when applying the skill.
To import a skill from a file:
1. Open the [Skills library](#skills-library-workspace) or your project's [Skills](#skills-project) page.
2. Click **Add skill**, then click **Import from file**.
3. Choose the `.md`, `.mdx`, or `.zip` file you want, then click **Import**.
Skills files have rules around their size and format. If you experience any problems importing your skills file, check that your file meets the [skills file requirements](#skills-file-requirements).
Individual `.md` or `.mdx` files can be up to 256 KB in size. `.zip` files can be up to 2 MB in size, including a 256 KB limit for the included skills file.
### Write instructions manually
In team workspaces, only admins can write a skill to the workspace library. Any team member can write a skill directly in a project.
For help writing an effective skill, including examples of each part, see [Skills file requirements](#skills-file-requirements).
To write a skill in Bolt:
1. Open the [Skills library](#skills-library-workspace) or your project's [Skills](#skills-project) page.
2. Click **Add skill**, then click **Write manually**.
3. Fill out the different parts of the skill:
* **Skill name:** Add a unique name in the format `your-skill-name`.
* **Description:** Describe what the skill does and when Bolt should use it.
* **Instructions:** The complete instructions to define what the skill does.
4. Click **Create**.
Skills you write can be up to 256 KB in size.
### Create a skill from chat
Bolt has a built-in `/skill-creator` skill it can use to write a skill for you. If you have a workflow in mind, describe it and ask Bolt to create it as a skill. You can also ask Bolt to create a skill based on the work you've done in chat. If you discover a great workflow while building, this lets you save and reuse it later.
To create a skill from chat, do one of the following:
* In the chatbox, send a prompt describing the skill you want.
* In your project's Skills page, click **Add skill** > **Build with Bolt**.
When Bolt creates a skill, it's saved in that project and turned on automatically. You can see it on your project's Skills page, under **In this project**.
## Turn skills on or off in a project
When a skill is turned on, Bolt applies it automatically when your prompt matches the skill's description, and you can apply it by typing `/$skill-name` in the chat. There's no limit to how many skills you can turn on in a project.
Skills have to be turned on for Bolt to use them. If you turn off a skill, you can't select it in that project, and Bolt won't automatically apply it, either.
You can turn workspace skills on or off per project so that only skills that fit the project get applied. Skills you add to a project or create from chat are always on for that project. If your project is shared, skills you turn on are available to all collaborators working in the project.
| How the skill was added | Projects in a personal workspace | Projects in a team workspace |
| ----------------------- | -------------------------------- | ---------------------------- |
| Skills library | On by default | Off by default |
| Directly in a project | Always on | Always on |
| Created from chat | Always on | Always on |
To turn a skill on or off in a project:
1. Open your Bolt project.
2. In the top menu, click the **gear icon**, then click **Skills**.
3. Find the skill you want, then turn it on or off.
When you send a prompt, Bolt looks at all the skills available in the project and applies whichever ones are relevant to your prompt. Bolt can automatically apply more than one skill to the same prompt.
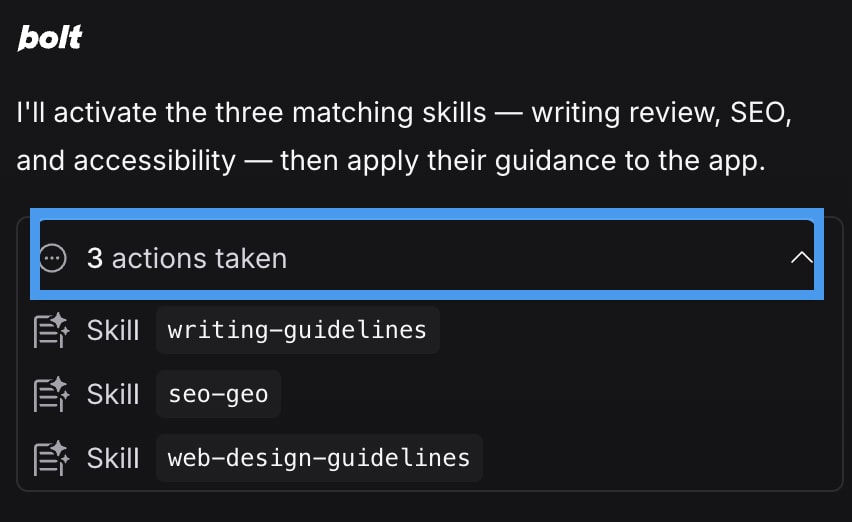
When a skill is triggered, the skill name shows in the chat, so you can see which skills have been applied to the current response.
## Apply a skill manually in the chat
There are two ways to apply a skill in chat:
* Select the skill by clicking the **plus icon** then pointing to **Skills** to show the available skills in your project.
* Type the skill name using a slash command.
When you apply a skill manually, you can select one skill per prompt.
### Pick from the Skills menu
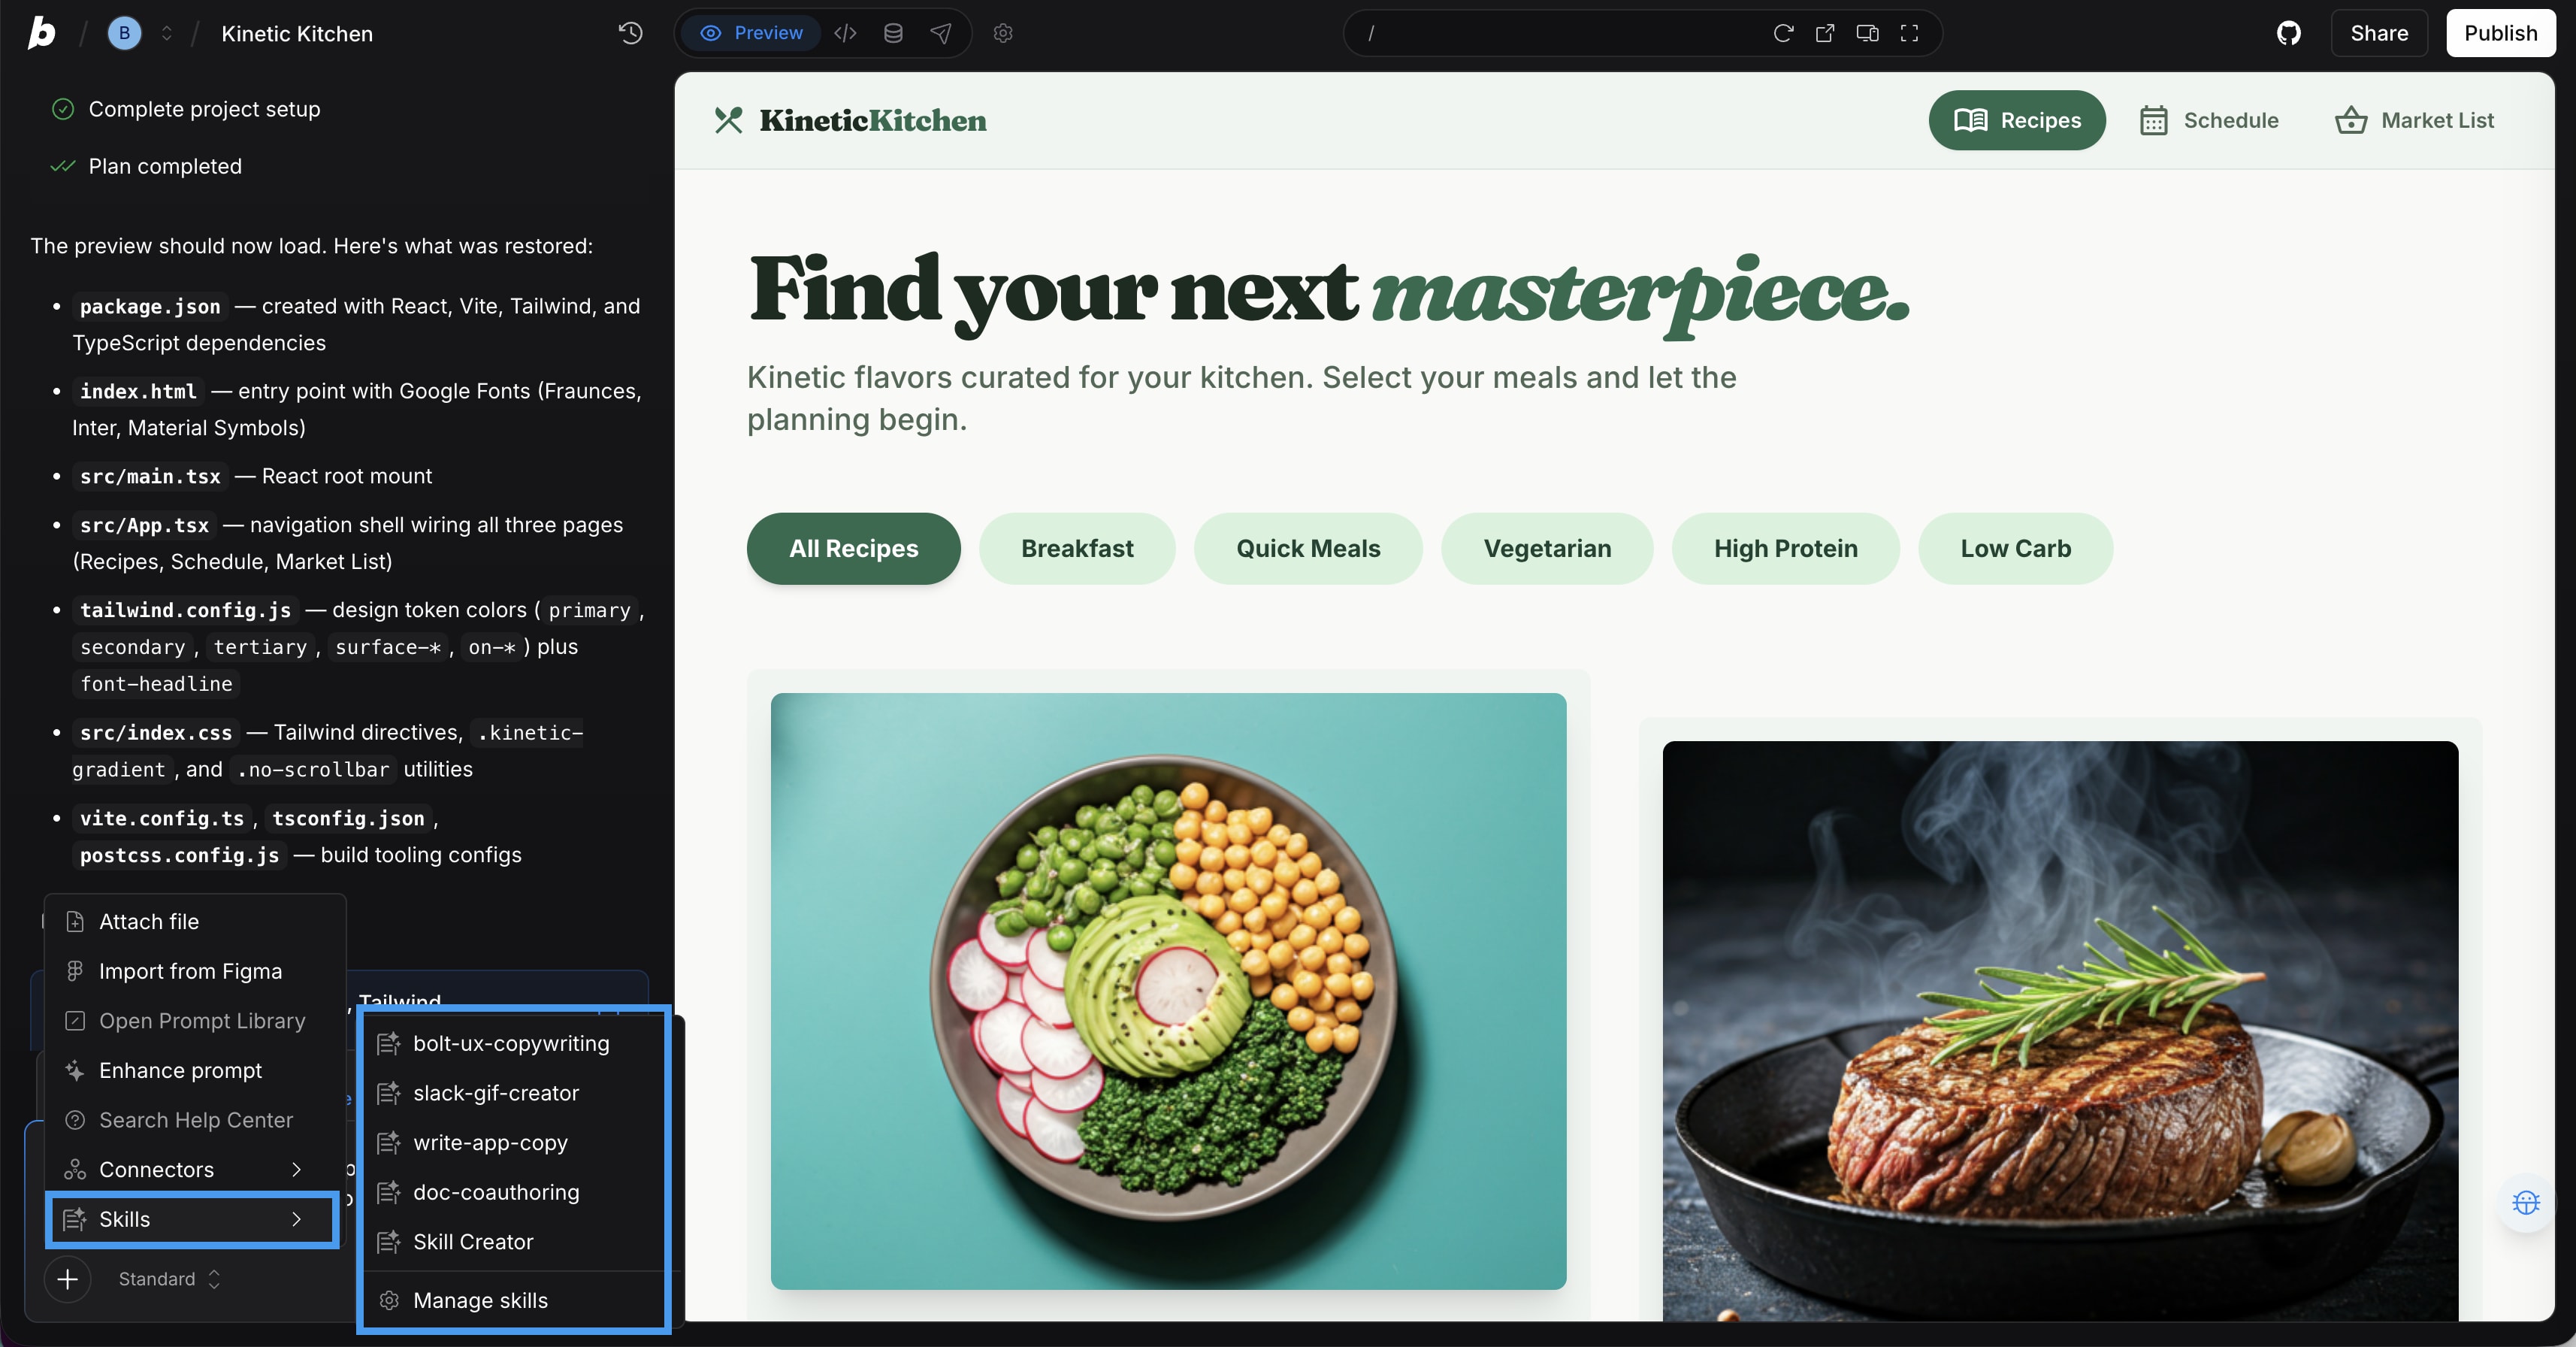 1. In the chatbox, click the **plus icon**.
2. Click **Skills**.
A list appears that shows skills available in your project.
3. Click the skill name to insert it into the chatbox.
### Type the skill name
1. In the chatbox, click the **plus icon**.
2. Click **Skills**.
A list appears that shows skills available in your project.
3. Click the skill name to insert it into the chatbox.
### Type the skill name
 1. In the chatbox, type `/$skill-name`. For example, `/write-app-copy`.
As you type, a menu opens showing the skills available in that project.
2. Hover over a skill to see its name and description.
3. Click the skill you want to apply.
### Apply a skill to your first prompt
To use a skill in your first prompt, you have to [pick from the Skills menu](#pick-from-the-skills-menu) in the chatbox on the Bolt homepage.
You can choose from any skill in your workspace, including Bolt-curated skills. The skill you choose stays turned on for the project afterward.
## Manage skills
Click the **three dots icon** next to a skill to access the following options:
* **Edit**: Edit the skill's name, description, or instructions.
* **Delete**: Remove the skill.
* **Download**: Download the skill file to your computer.
* **Add to Skill library**: Available for project skills. To learn more, see [Add a project skill to your workspace](#add-a-project-skill-to-your-workspace).
### Add a project skill to your workspace
If you write a skill in one project and want to reuse it elsewhere, you can add it to your workspace's Skills library so it's available to turn on in other projects.
In a personal workspace, you can add any project skill to your workspace. In a team workspace, only a team admin can add a project skill to the Skills library, but team members can [download the skill](#download-a-project-skill) and share it with an admin.
To add a project skill to your workspace:
1. In the project's Skills page, find the skill you want to add, then click the **three dots icon** next to the skill's name.
2. Click **Add to Skill library**.
After you've added a project skill to the Skills library, the two copies are independent. Editing the project skill doesn't change the workspace skill, and editing the workspace skill doesn't change the project skill.
If the same skill exists in a project and workspace, Bolt uses the project skill.
### Download a project skill
If you don't have permission to add a skill to the Skills library, or you want to share it outside Bolt, you can download it as a file.
To download a project skill:
1. In the project's Skills page, find the skill you want, then click the **three dots icon** next to the skill's name.
2. Click **Download**.
This saves the skill's `SKILL.md` file to your computer. You can share it with a workspace admin, or [import it](#import-from-a-file) into a workspace or another project yourself.
### Permissions in team workspaces
* **Admins** can add, edit, download, and delete skills in their team workspace. When a skill is deleted, it's deleted for all team members and removed from their projects.
* **Team members** can view workspace skills and turn them on or off per project. Members can't add workspace skills but can add skills in a project and edit, download, and delete any skills they've added.
## Duplicate or transfer a project that uses skills
When you [duplicate](/building/using-bolt/projects-files#duplicate-a-project) a project, the duplicate stays in the same workspace, so all the same skills are available.
When you [transfer](/building/using-bolt/projects-files#transfer-a-project) a project, only skills added directly to the project move with it. Workspace skills don't transfer because they belong to the workspace, not the project.
## Delete a project that uses skills
[Project skills](#project-skills) are stored in the project's code, so deleting the project deletes the skill along with it.
To keep a project skill, [add it to your workspace's Skills library](#add-a-project-skill-to-your-workspace) or [download it](#download-a-project-skill) before you delete the project.
Deleting a project doesn't affect workspace skills, since those are stored separately from any one project's code.
## Skills file requirements
Every skills file needs two parts:
* A frontmatter section, which needs entries for `name` and `description`
* Instructions, which define the rules or workflow you want Bolt to apply
### Frontmatter
A clear, specific `description` is important in making sure Bolt applies your skill in the right situations. Start with "Use when" and write the description to include a trigger, scope, and boundary:
* **Trigger**: The situations when Bolt should apply the skill. For example, "Use when writing or editing any text that appears in an app's interface."
* **Scope**: Specific examples when the skill applies. For example, "Covers button labels, calls to action, headings, and empty states."
* **Boundary**: Specific examples when the skill doesn't apply. This helps distinguish between similar skills and prevents Bolt from using the skill where it isn't relevant. For example, "Doesn't apply to placeholder content or sample user data like names or emails."
Combine these elements into a short paragraph that covers when Bolt should apply the skill, what it applies to, and when it doesn't apply.
The description is the main way you can control when Bolt uses a skill. If Bolt applies a skill too often, the description is probably too broad. If it never applies the skill automatically, the description is too narrow or doesn't match how you're prompting.
A frontmatter section looks like this:
```text theme={"system"}
---
name: write-app-copy
description: "Use when writing or editing any text that appears in an app's interface. Covers button labels, calls to action, headings, and empty states. Doesn't apply to placeholder content or sample user data like names or emails."
---
```
When you import a skill [from GitHub](#import-skills-from-github) or [from a file](#import-from-a-file), Bolt checks that each file has a valid frontmatter section at the top of the file, and that it follows a certain format. If your frontmatter isn't formatted correctly, you'll see an error.
| Frontmatter field | Can include | Can't include | Size limit |
| ----------------- | ----------------------------------------------------------------- | ------------------------------------------------------------------------------- | ----------------------- |
| `name` | Lowercase letters, numbers, and hyphens | Spaces, underscores, XML tags, or reserved words (like "anthropic" or "claude") | Maximum 64 characters |
| `description` | Free-form text, including spaces, full sentences, and punctuation | XML tags | Maximum 1024 characters |
If you [write the skill yourself](#write-instructions-manually), Bolt helps you observe these rules. For example, Bolt automatically changes any spaces, underscores, or capital letters you enter in the **Skill Name** field so they fit the frontmatter requirements. That's why you'll notice all skill names you write in Bolt follow the format `your-skill-name`.
### Instructions
Instructions define the rules, guidelines, and workflows you want Bolt to follow when applying your skill. Follow these tips to write an effective skill:
* **Cover one topic per skill.** Skills work best when they focus on a specific, well-defined topic. If you find yourself writing sections that feel unrelated, consider splitting them into separate skills.
* **Write in plain language.** Use short, clear sentences. Avoid jargon and unnecessary detail.
* **Use headings to separate distinct subtopics.** If your skill covers more than one aspect of a topic, headings help Bolt apply the right section to the right situation.
```text theme={"system"}
# Write app copy for your Bolt project
Read this skill before writing or editing UI copy. Apply these principles to button labels, calls to action, headings, and empty states.
## Core principle
Good UI copy is invisible. It tells users what to do, what happened, or what to expect without drawing attention to itself. When copy is unclear or inconsistent, users slow down or lose trust in the product.
## Voice and tone
- Write in second person ("you") when addressing the user.
- Use present tense.
- Keep the tone friendly but not overly casual. Match the formality of the product's audience.
- Use contractions to keep copy conversational.
- Don't use jargon unless the target audience expects it.
## Buttons and calls to action
- Use verb-first labels that describe the action. Write "Save changes" not "OK."
- Be specific. Write "Delete account" not "Confirm."
- Keep labels short. Two to four words is usually enough.
- Match the label to the outcome. If clicking a button creates something, the label should say "Create," not "Submit."
## Headings and section titles
- Use sentence case. Capitalize only the first word and proper nouns.
- Write headings that describe the content in the section, not just name it. Write "Your recent orders" not "Orders."
- Keep headings short. If a heading needs more than a few words, consider whether the section is too broad.
## Empty states
- Tell users why the space is empty and what they can do about it.
- Include a call to action when there's a relevant next step.
- Keep the tone encouraging, not clinical. Write "You haven't added any products yet. Click Add product to get started" not "No products found."
## Consistency
- Use the same word for the same thing throughout the app. If a feature is called "Projects" in one place, don't call it "Work" or "Items" somewhere else.
- Use the same verb patterns for similar actions. If one action uses "Add," similar actions should use "Add" too, not "Create," "New," or "Insert."
```
## Troubleshooting
If Bolt doesn't apply a skill automatically when you expect it to, try rewording your prompt to match the skill's description more closely, or [apply it manually in the chat](#apply-a-skill-manually-in-the-chat).
A skill applies automatically when it's turned on for the current project and your prompt closely matches the trigger, scope, and boundary described in the skill's description. See [Skills file requirements](#skills-file-requirements) for tips on writing a clearer description.
## FAQs
Bolt skills use an open format shared by other AI tools, so you can bring in a skill you built somewhere else by [importing from GitHub](#import-skills-from-github) or [importing from a file](#import-from-a-file).
Bolt looks at all the skills available in a project and applies the ones that are relevant to your prompt. Skills can't directly reference each other, but Bolt can apply multiple skills independently to the same task.
When a skill is triggered, the name shows in the chat, so you can see which skills have been applied to the current response. If Bolt applies more than one skill, you may have to expand the **actions taken** menu in the chat to see the individual skill names.
1. In the chatbox, type `/$skill-name`. For example, `/write-app-copy`.
As you type, a menu opens showing the skills available in that project.
2. Hover over a skill to see its name and description.
3. Click the skill you want to apply.
### Apply a skill to your first prompt
To use a skill in your first prompt, you have to [pick from the Skills menu](#pick-from-the-skills-menu) in the chatbox on the Bolt homepage.
You can choose from any skill in your workspace, including Bolt-curated skills. The skill you choose stays turned on for the project afterward.
## Manage skills
Click the **three dots icon** next to a skill to access the following options:
* **Edit**: Edit the skill's name, description, or instructions.
* **Delete**: Remove the skill.
* **Download**: Download the skill file to your computer.
* **Add to Skill library**: Available for project skills. To learn more, see [Add a project skill to your workspace](#add-a-project-skill-to-your-workspace).
### Add a project skill to your workspace
If you write a skill in one project and want to reuse it elsewhere, you can add it to your workspace's Skills library so it's available to turn on in other projects.
In a personal workspace, you can add any project skill to your workspace. In a team workspace, only a team admin can add a project skill to the Skills library, but team members can [download the skill](#download-a-project-skill) and share it with an admin.
To add a project skill to your workspace:
1. In the project's Skills page, find the skill you want to add, then click the **three dots icon** next to the skill's name.
2. Click **Add to Skill library**.
After you've added a project skill to the Skills library, the two copies are independent. Editing the project skill doesn't change the workspace skill, and editing the workspace skill doesn't change the project skill.
If the same skill exists in a project and workspace, Bolt uses the project skill.
### Download a project skill
If you don't have permission to add a skill to the Skills library, or you want to share it outside Bolt, you can download it as a file.
To download a project skill:
1. In the project's Skills page, find the skill you want, then click the **three dots icon** next to the skill's name.
2. Click **Download**.
This saves the skill's `SKILL.md` file to your computer. You can share it with a workspace admin, or [import it](#import-from-a-file) into a workspace or another project yourself.
### Permissions in team workspaces
* **Admins** can add, edit, download, and delete skills in their team workspace. When a skill is deleted, it's deleted for all team members and removed from their projects.
* **Team members** can view workspace skills and turn them on or off per project. Members can't add workspace skills but can add skills in a project and edit, download, and delete any skills they've added.
## Duplicate or transfer a project that uses skills
When you [duplicate](/building/using-bolt/projects-files#duplicate-a-project) a project, the duplicate stays in the same workspace, so all the same skills are available.
When you [transfer](/building/using-bolt/projects-files#transfer-a-project) a project, only skills added directly to the project move with it. Workspace skills don't transfer because they belong to the workspace, not the project.
## Delete a project that uses skills
[Project skills](#project-skills) are stored in the project's code, so deleting the project deletes the skill along with it.
To keep a project skill, [add it to your workspace's Skills library](#add-a-project-skill-to-your-workspace) or [download it](#download-a-project-skill) before you delete the project.
Deleting a project doesn't affect workspace skills, since those are stored separately from any one project's code.
## Skills file requirements
Every skills file needs two parts:
* A frontmatter section, which needs entries for `name` and `description`
* Instructions, which define the rules or workflow you want Bolt to apply
### Frontmatter
A clear, specific `description` is important in making sure Bolt applies your skill in the right situations. Start with "Use when" and write the description to include a trigger, scope, and boundary:
* **Trigger**: The situations when Bolt should apply the skill. For example, "Use when writing or editing any text that appears in an app's interface."
* **Scope**: Specific examples when the skill applies. For example, "Covers button labels, calls to action, headings, and empty states."
* **Boundary**: Specific examples when the skill doesn't apply. This helps distinguish between similar skills and prevents Bolt from using the skill where it isn't relevant. For example, "Doesn't apply to placeholder content or sample user data like names or emails."
Combine these elements into a short paragraph that covers when Bolt should apply the skill, what it applies to, and when it doesn't apply.
The description is the main way you can control when Bolt uses a skill. If Bolt applies a skill too often, the description is probably too broad. If it never applies the skill automatically, the description is too narrow or doesn't match how you're prompting.
A frontmatter section looks like this:
```text theme={"system"}
---
name: write-app-copy
description: "Use when writing or editing any text that appears in an app's interface. Covers button labels, calls to action, headings, and empty states. Doesn't apply to placeholder content or sample user data like names or emails."
---
```
When you import a skill [from GitHub](#import-skills-from-github) or [from a file](#import-from-a-file), Bolt checks that each file has a valid frontmatter section at the top of the file, and that it follows a certain format. If your frontmatter isn't formatted correctly, you'll see an error.
| Frontmatter field | Can include | Can't include | Size limit |
| ----------------- | ----------------------------------------------------------------- | ------------------------------------------------------------------------------- | ----------------------- |
| `name` | Lowercase letters, numbers, and hyphens | Spaces, underscores, XML tags, or reserved words (like "anthropic" or "claude") | Maximum 64 characters |
| `description` | Free-form text, including spaces, full sentences, and punctuation | XML tags | Maximum 1024 characters |
If you [write the skill yourself](#write-instructions-manually), Bolt helps you observe these rules. For example, Bolt automatically changes any spaces, underscores, or capital letters you enter in the **Skill Name** field so they fit the frontmatter requirements. That's why you'll notice all skill names you write in Bolt follow the format `your-skill-name`.
### Instructions
Instructions define the rules, guidelines, and workflows you want Bolt to follow when applying your skill. Follow these tips to write an effective skill:
* **Cover one topic per skill.** Skills work best when they focus on a specific, well-defined topic. If you find yourself writing sections that feel unrelated, consider splitting them into separate skills.
* **Write in plain language.** Use short, clear sentences. Avoid jargon and unnecessary detail.
* **Use headings to separate distinct subtopics.** If your skill covers more than one aspect of a topic, headings help Bolt apply the right section to the right situation.
```text theme={"system"}
# Write app copy for your Bolt project
Read this skill before writing or editing UI copy. Apply these principles to button labels, calls to action, headings, and empty states.
## Core principle
Good UI copy is invisible. It tells users what to do, what happened, or what to expect without drawing attention to itself. When copy is unclear or inconsistent, users slow down or lose trust in the product.
## Voice and tone
- Write in second person ("you") when addressing the user.
- Use present tense.
- Keep the tone friendly but not overly casual. Match the formality of the product's audience.
- Use contractions to keep copy conversational.
- Don't use jargon unless the target audience expects it.
## Buttons and calls to action
- Use verb-first labels that describe the action. Write "Save changes" not "OK."
- Be specific. Write "Delete account" not "Confirm."
- Keep labels short. Two to four words is usually enough.
- Match the label to the outcome. If clicking a button creates something, the label should say "Create," not "Submit."
## Headings and section titles
- Use sentence case. Capitalize only the first word and proper nouns.
- Write headings that describe the content in the section, not just name it. Write "Your recent orders" not "Orders."
- Keep headings short. If a heading needs more than a few words, consider whether the section is too broad.
## Empty states
- Tell users why the space is empty and what they can do about it.
- Include a call to action when there's a relevant next step.
- Keep the tone encouraging, not clinical. Write "You haven't added any products yet. Click Add product to get started" not "No products found."
## Consistency
- Use the same word for the same thing throughout the app. If a feature is called "Projects" in one place, don't call it "Work" or "Items" somewhere else.
- Use the same verb patterns for similar actions. If one action uses "Add," similar actions should use "Add" too, not "Create," "New," or "Insert."
```
## Troubleshooting
If Bolt doesn't apply a skill automatically when you expect it to, try rewording your prompt to match the skill's description more closely, or [apply it manually in the chat](#apply-a-skill-manually-in-the-chat).
A skill applies automatically when it's turned on for the current project and your prompt closely matches the trigger, scope, and boundary described in the skill's description. See [Skills file requirements](#skills-file-requirements) for tips on writing a clearer description.
## FAQs
Bolt skills use an open format shared by other AI tools, so you can bring in a skill you built somewhere else by [importing from GitHub](#import-skills-from-github) or [importing from a file](#import-from-a-file).
Bolt looks at all the skills available in a project and applies the ones that are relevant to your prompt. Skills can't directly reference each other, but Bolt can apply multiple skills independently to the same task.
When a skill is triggered, the name shows in the chat, so you can see which skills have been applied to the current response. If Bolt applies more than one skill, you may have to expand the **actions taken** menu in the chat to see the individual skill names.
 Bolt looks at all the skills available in a project and applies the ones that are relevant to your prompt. We recommend that you keep skills focused and avoid having multiple skills with conflicting information that can apply to the same workflow. To learn more about writing a skill, see [Skills file requirements](#skills-file-requirements).
The number of skills you have turned on shouldn't meaningfully affect how many tokens Bolt uses. When a skill is turned on, Bolt only looks at its name and description until you send a prompt that matches the skill. Then, it uses tokens to read the skill's full instructions so it can apply the skill.
In a team workspace, [only admins can edit skills](#permissions-in-team-workspaces). The latest saved edit becomes the current version for everyone. If you need version control for your skills file, we recommend maintaining the skill in [GitHub, and importing it from there](#import-skills-from-github) instead.
Bolt looks at all the skills available in a project and applies the ones that are relevant to your prompt. We recommend that you keep skills focused and avoid having multiple skills with conflicting information that can apply to the same workflow. To learn more about writing a skill, see [Skills file requirements](#skills-file-requirements).
The number of skills you have turned on shouldn't meaningfully affect how many tokens Bolt uses. When a skill is turned on, Bolt only looks at its name and description until you send a prompt that matches the skill. Then, it uses tokens to read the skill's full instructions so it can apply the skill.
In a team workspace, [only admins can edit skills](#permissions-in-team-workspaces). The latest saved edit becomes the current version for everyone. If you need version control for your skills file, we recommend maintaining the skill in [GitHub, and importing it from there](#import-skills-from-github) instead.